How to Create an Account on Amazon Seller Central (6 Quick Steps)
Ecommerce today has become a great way to shop simply with a click. It has transformed traditional shopping beyond recognition. Not very long ago, people didn’t trust online products, but today, improved services have gained customers’ trust.
Ecommerce has become a buzz. And people keep surfing all the time and shop very frequently as it has become easy and attractive for people to shop online. The services like cash on delivery, easy return & refund have made it easier. Customers are more than satisfied. It is a smart way to shop.
What is Amazon Seller Central?

Amazon seller central is a web interface between merchants and customers that is used by millions of sellers to sell their products online through Amazon to Amazon customers. For this, an Amazon FBA seller must have a seller central account, and the seller will be considered a third-party seller or marketplace.
Amazon provides you with two options for the fulfillment of your orders. You can do it through Amazon, where you don’t have to worry about your orders’ shipping, packaging, and delivery. Amazon will keep your products in its warehouse and deliver them to your customer’s doorstep. It will even take care of refunds and customer care services.
And the second option is to make the fulfillment on your own. You can appoint people for the whole process by not paying Amazon.
Learn more about fulfillment options Amazon FBA vs FBM.
How to Create an Account on Amazon Seller Central?

Starting an Amazon FBA business and selling on Amazon is very simple. All you need to do is create an account and get started. You can start with wholesale products, Handmade products, or even sell things you no longer use.
After some time, you can make it as big as you want or as basic as you like.
Once you’ve figured out the best products to sell on Amazon FBA, you’ll have to register yourself on Amazon, which means creating an account on Amazon.
6 Quick Steps to Create an Amazon Seller Central Account
Step 1: First, Open Amazon Official Site
Click on the link and you’ll reach the Amazon seller page.
Step 2: Choose to Sign up from “Become an Amazon seller”
Here, click the sign-up button. Choose between an individual or professional seller account.
Things to Remember: There are two options to choose from while creating an account on amazon seller central. One as a professional seller and the other as an Individual seller. If you are going to do FBA or have a big catalog, then you should choose a Professional plan, which will cost $39.99 a month. And if you are not a professional, you can sell less than 40 products monthly. You‘ll not be charged for it.
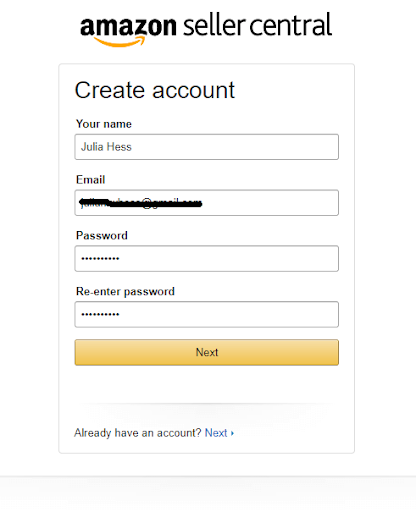
Step 3: Get started selling on Amazon “Create a New Account”
Here you need to fill in the basic personal information. Enter your Email address or phone number and strong password then click “Create a New Account”.

Step 4: Give a legal name to your store
After sign-up and account setup, Amazon will now ask for the Legal name of your store. If you are not a professional, you can put any unique name for your Amazon Store and click to agree with the Terms and conditions.
Step 5: Fill in required business details and information
Now, Amazon will ask you to input your business information and to enter your contact number for OTP.
Step 6: At last, Set up billing information and done
After filling business information, you need to fill in the billing information so that you can pay the charges to Amazon when required. That’s all you have successfully created an account on Amazon seller central. Now, log in.
Step 7: Log in to your account
Now to can simply enter your ID and Password and log in to your account. https://sellercentral.amazon.com Click to login.
Once your Amazon account is created, you can start selling your products on Amazon.
For that, you need to follow the following steps:
How to Sell Products on Amazon?
1. Product Listing
For selling your products on Amazon, you’ll have to list your product first so that customers can see your products and buy them. But, How to do Amazon product listing? Follow the link to learn more.

you’ll also need to prepare a product description with some good keywords with the best amazon keyword research tool so that your product can reach your customer. And also add pictures of your product for a better understanding of it. You can always hire a professional for this.
2. Receiving Orders
Once your product is listed, Your product will reach millions of customers and you’ll start receiving orders.

If your product is fulfilled by Amazon you’ll get the prime membership or you can also take sponsored ads to reach your targeted audience.
3. Product Delivery
In this step, you need to decide whether you want to get your products delivered by Amazon or you want to do it by yourself.
If you take the fulfillment by Amazon service, you’ll not have to worry about the product shipment, packaging, storage, and delivery. Amazon will take care of everything including the returns, refunds, and customer service. Apart from this, you also get benefits like Prime Memberships, Add to bag options, and professional services.
And if you want to do it on your own, you’ll have to hire some professionals for the same. You can decide it by comparing the cost incurred in both.
Get your Amazon store launched quickly with the best Amazon store management agency. We provide complete assistance from setting up Amazon store to selling on Amazon. Get in touch with us now!
4. Receiving Payments
Once you are done with this process, you’ll start receiving your payments. Amazon will deduct its seller’s fees from your payments, and you’ll receive the remaining amount in your account in 14 days; for more, contact an Amazon expert consultant in the USA.
Conclusion
By following these simple steps, you can create an account on Amazon, find the best Amazon FBA suppliers, and start selling your products online.

